Mississauga driveway widening planning is the process of assessing zoning rules, property lines, base preparation, drainage, and materials to safely extend a driveway. In Mississauga, homeowners plan width, slope, and setbacks before work begins to avoid encroachments and utility conflicts. Done right, widening adds parking, improves curb appeal, and prevents drainage issues.
By HR Greenroots Landscaping • Last updated: 2026-06-24
At a Glance: Your Mississauga Driveway Widening Game Plan
Start with property lines, zoning rules, and a simple sketch. Confirm utilities, set drainage slope (about 1–2%), and choose materials that match your home. Plan a compacted base (often 6–12 inches), set strong edges, and coordinate with landscaping for a clean, lasting result.
Planning your driveway extension is simpler when you break it into clear steps. Use this overview to see the whole project in one view, then dive into each section below.
- What is driveway widening planning?
- Why widening matters in Mississauga
- How the process works (step-by-step)
- Types, materials, and layout methods
- Best practices that prevent rework
- Tools and resources you’ll actually use
- Local scenarios and mini case studies
- FAQ
- Conclusion + key takeaways
What Is Driveway Widening Planning?
Driveway widening planning is the upfront design and compliance work that determines how far and where you can extend your driveway, what base and edging you need, and how to manage water flow. It ties together zoning limits, utilities, grading, and materials so the finished surface is safe, durable, and attractive.
In our experience delivering driveway extensions across Mississauga, planning sets 80% of your outcome. A few hours measuring, sketching, and checking rules can save weeks of corrections or repairs later.
Core elements you’ll define
- Width and placement: Typical passenger parking needs 8.5–9 feet per vehicle; add 2–3 feet for doors to open near steps or fences.
- Setbacks and encroachments: Keep extensions inside your lot line and away from municipal boulevards and sidewalks.
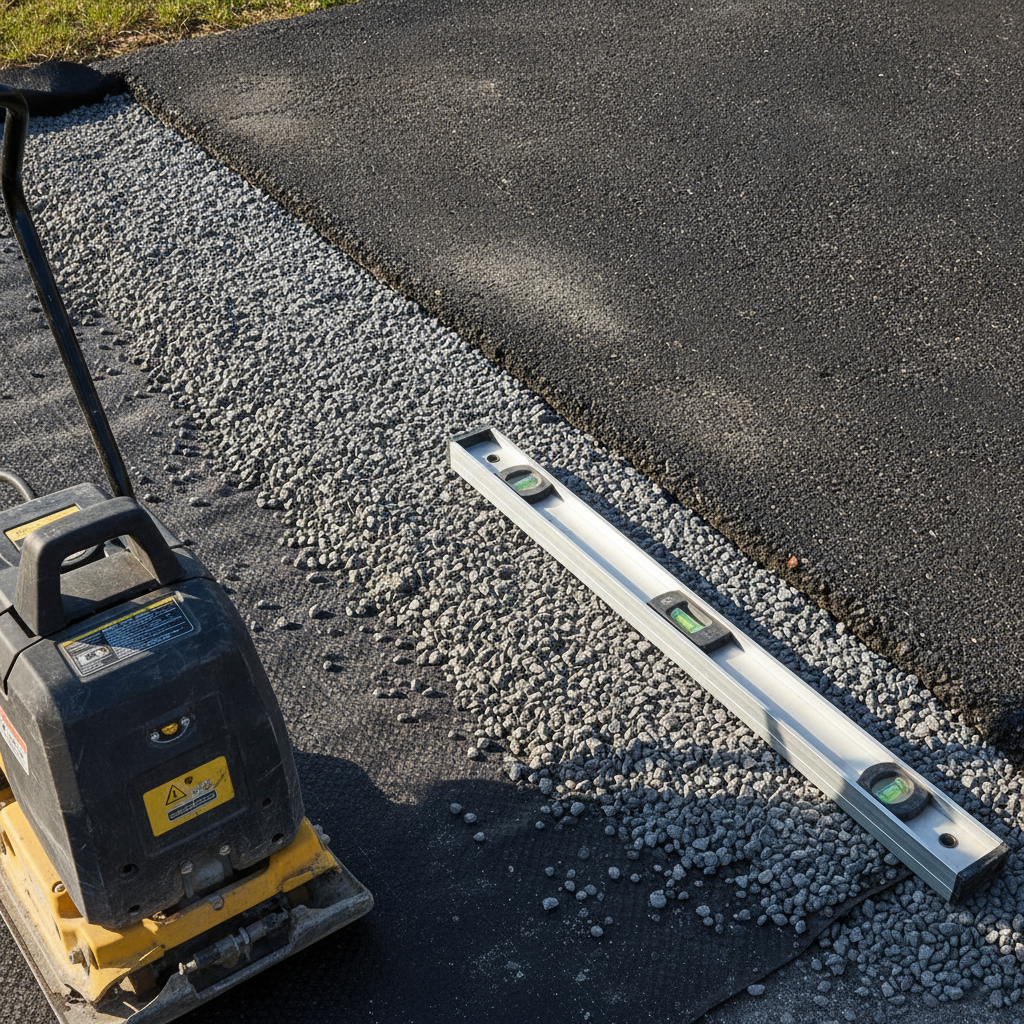
- Structure beneath the surface: A compacted aggregate base (often 6–12 inches) over geotextile limits settlement and weeds.
- Drainage slope: Aim for about 1–2% away from your house; avoid pushing runoff to neighbors or sidewalks.
- Edge control: Concrete curbing or paver restraints stop spreading and protect borders and plant beds.
We connect these factors to your broader landscape layout so traffic flow, beds, and privacy remain cohesive—not just more pavement.
Why Mississauga Driveway Widening Matters
Widening boosts parking capacity, reduces street parking stress, and increases daily convenience. It also shapes curb appeal and stormwater behavior. Good planning prevents settlement, pooling, or boundary issues, protecting your property and your relationship with neighbors.
Here’s the thing: driveway space sets the tone every single day. When two vehicles fit comfortably, morning schedules run on time. When water sheds cleanly at a 1–2% grade, you avoid icy patches in winter and ponding after summer storms.
Benefits homeowners feel immediately
- More usable space: A second parking stall is typically 8.5–9 feet wide; a shared aisle at 10–12 feet feels natural for two cars.
- Cleaner edges and circulation: Defined borders reduce lawn rutting, and wider paths improve walk safety.
- Improved curb appeal: Matching interlocking pavers or crisp edging ties into walkways and steps.
- Lower maintenance: A stable base and edging cut migration, heaving, and weed intrusion.
When we widen, we also look at fencing, bed lines, and lighting. One coordinated plan lowers long-term upkeep and keeps the front yard organized.
How Driveway Widening Works (Step-by-Step)
Map your lot, call for utility locates, and sketch a widening within property lines. Set drainage targets, pick materials, and detail a layered base. Install geotextile, compact aggregate in lifts, add edging, lay finish surface, and seal or sand joints. Inspect, document, and maintain seasonally.
We follow a consistent, field-tested sequence so the work stays predictable and safe.
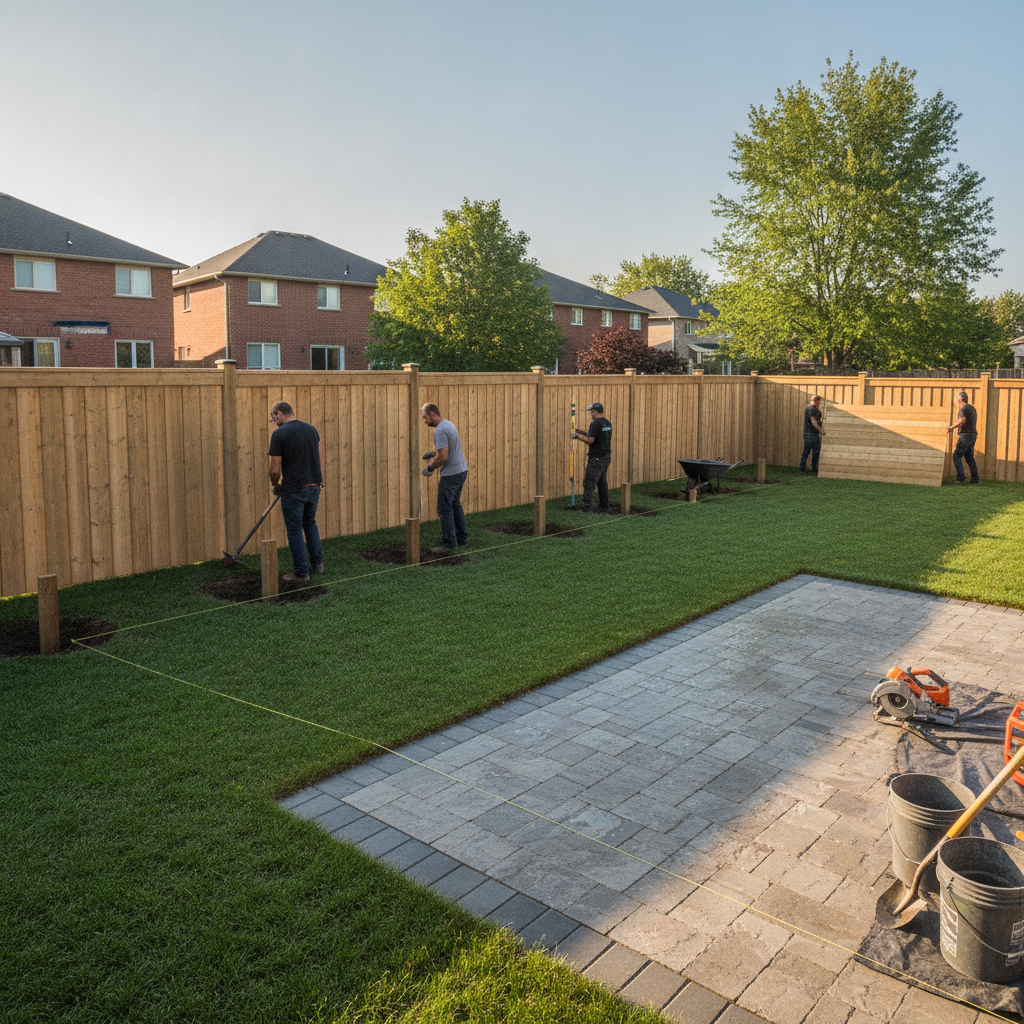
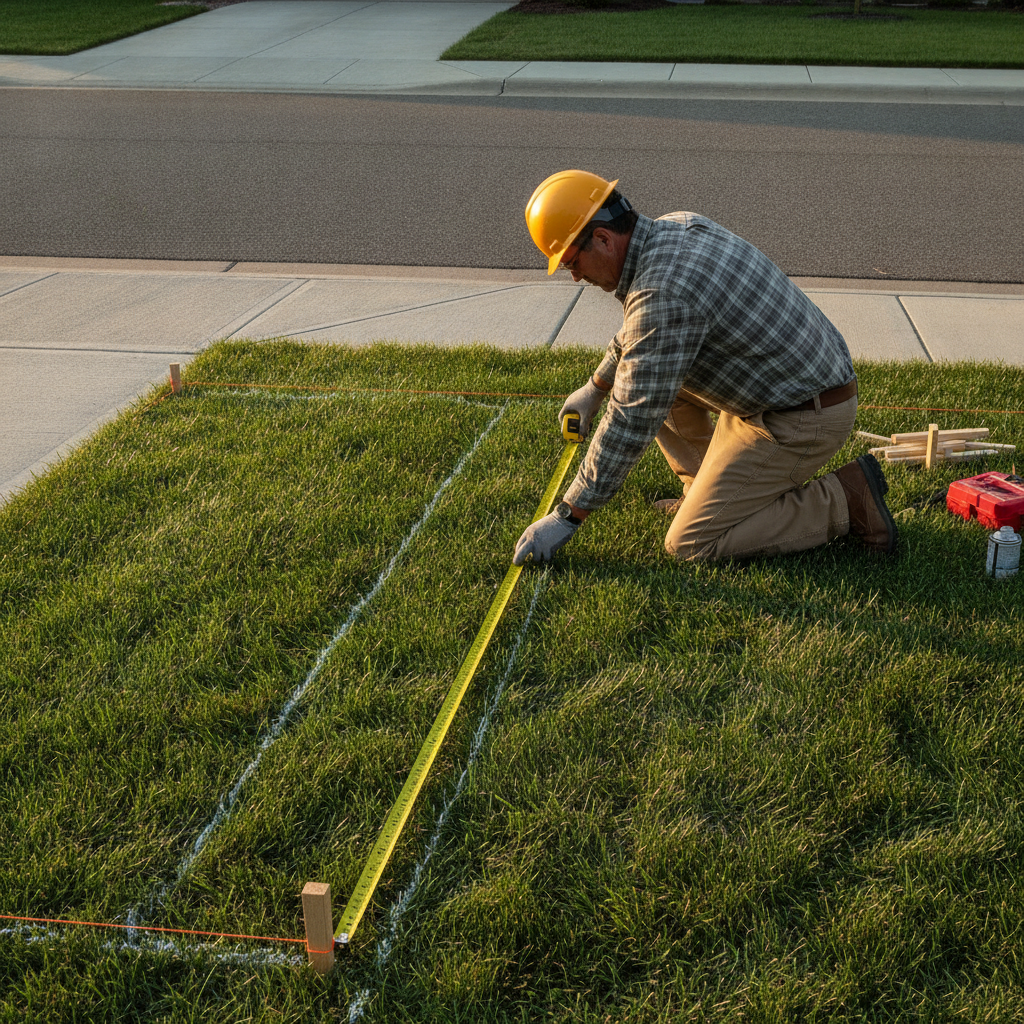
- Confirm property lines: Pull your survey or site plan; flag potential encroachments.
- Call for utility locates: Book locates before any digging. Painted marks and flags guide safe excavation.
- Sketch the layout: Define added width (often 8–10 feet for a full stall) and transitions to walks or steps.
- Set drainage: Target roughly 1–2% fall away from the house and toward safe collection points.
- Choose materials: Interlocking pavers, asphalt tie-ins, or concrete—each with specific base depth and edge control.
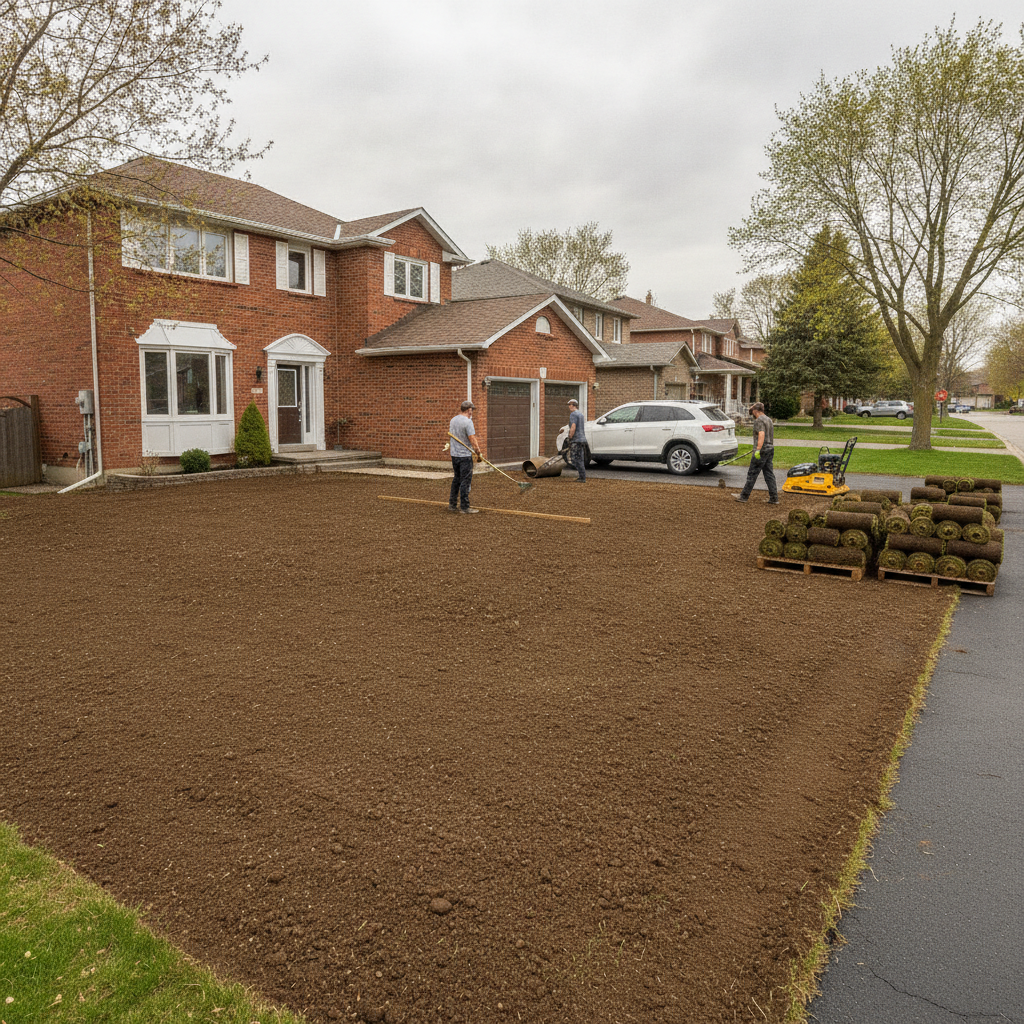
- Excavate to design depth: Remove topsoil/organics; typical total depth can reach 8–14 inches depending on finish.
- Place geotextile: Separate native soils from base; reduce pumping and settlement.
- Install granular base: Compact in 3–4 inch lifts to 95%+ density for stability.
- Set edging or forms: Use concrete curbs, paver restraints, or forms that lock the edge.
- Lay finish surface: Screed bedding layer for pavers, pour and finish concrete, or match asphalt courses cleanly.
- Joint stabilization: For pavers, apply polymeric sand; for concrete, saw control joints as specified.
- Punch list and maintenance plan: Inspect edges, confirm slopes, and plan seasonal checks.
Because widening crosses into landscaping, we also protect trees, adjust irrigation, and re-edge nearby beds so your upgrade blends in on day one.
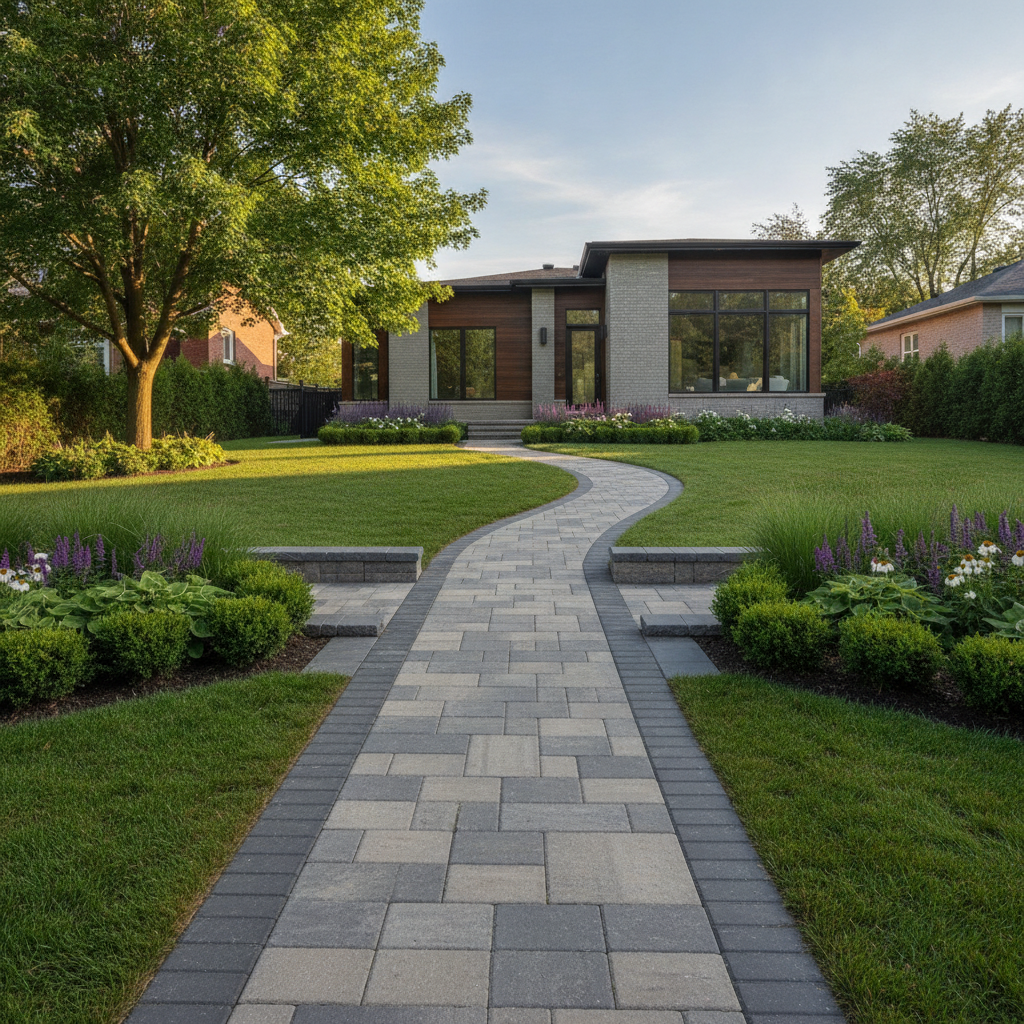
Types, Materials, and Layout Methods
You can widen with interlocking pavers, concrete, or asphalt. Pavers excel at curb appeal and repairability, concrete provides a monolithic slab, and asphalt ties in smoothly to existing drives. Each needs a strong base, edging, and proper slopes to perform over freeze-thaw cycles.
Material choice affects look, installation time, and maintenance. Here’s a practical comparison you can scan quickly.
Approach Base (typical) Edge Control Drainage/Slope Notable Strength Interlocking pavers 8–12 in compacted aggregate + 1 in bedding Paver restraints or concrete curb ~1–2% away from structures Repairable by section; premium aesthetics Poured concrete 6–10 in compacted base (site dependent) Formed edges and saw-cut joints ~1–2% away from structures Monolithic strength; crisp lines Asphalt tie-in 8–12 in base; match asphalt lifts Concrete curb or header course ~1–2% away from structures Smooth tie to existing asphaltWhen we recommend each option
- Pavers: When you want premium curb appeal and easy future service around utilities.
- Concrete: When a clean, monolithic look fits modern architecture and snow shoveling is frequent.
- Asphalt: When the existing driveway is asphalt and continuity is the priority.
If you’re pairing widening with a new front walk, pavers make it simple to match textures and borders for a unified entrance.
Driveway Widening Best Practices (Mississauga)
Document property limits, protect drainage paths, and overbuild your base. Use geotextile, compact in thin lifts, and lock edges. Blend widening with walkways, fences, and beds so the whole front yard functions better—not just the parking pad.
We’ve found a few practices consistently deliver durable results in Mississauga’s freeze-thaw climate.
Field-proven tips
- Design fall first: Target 1–2% away from the house and don’t trap water at steps or the sidewalk.
- Separate soils: Install geotextile under base to limit pumping and fines moving upward.
- Compact in lifts: Keep lifts to 3–4 inches; verify density with plate compactor passes.
- Edge restraint: Use concrete curbing or rigid paver restraints to stop lateral spread.
- Transition cleanly: Where new meets old, avoid lips over 1/4 inch for trip safety and snow shoveling.
- Snow planning: Provide a 3–4 foot snow storage area that won’t crush plantings.
Local considerations for Mississauga
- Busy school or campus streets near Lambton College can benefit from wider on-site parking to reduce curbside congestion at peak hours.
- Plan widening after spring thaw; base compaction is more consistent from late spring to early fall than in freeze–thaw shoulder seasons.
- Coordinate with fencing or privacy screens if you’re adjacent to Saigon Park paths or public views to keep sightlines tidy.
For homeowners consolidating upgrades, we often align widening with a front walk refresh and a mulch edge clean-up—one crew, one schedule.
Tools and Resources You’ll Actually Use
Use a site survey, utility locates, string lines, and a 2–4 foot level to set grades. Rely on geotextile, 3/4 inch aggregate, a plate compactor, and rigid edge restraints. Keep a seasonal checklist for sweeping, joint sand, and sealing where appropriate.
Here’s a practical kit that keeps planning and installation tight.
Planning and layout
- Site survey: Confirms your side lot lines and front setback.
- Measuring tools: 100-foot tape, string lines, stakes, and marking paint.
- Level and straightedge: 2–4 foot level to verify 1–2% slopes.
Subgrade and base
- Excavation tools: Shovels and compact machinery where required.
- Geotextile fabric: Stabilizes the base and reduces mixing with native soil.
- Granular base: Well-graded aggregate compacted in thin lifts to high density.
- Plate compactor: Essential for reaching target compaction efficiently.
Finish systems
- Paver systems: Bedding layer, spacers, and polymeric joint sand.
- Concrete: Forms, reinforcement as specified, and control-joint layout.
- Asphalt: Proper overlaps with existing, tack coats, and clean joints.
For a broader look at how we coordinate hardscapes with plantings, see our landscape design and build guide. It shows how driveways, walks, and beds connect into one daily-use plan.
Local Scenarios and Mini Case Studies
Successful driveway widening projects share a few traits: clean property-line alignment, strong base prep, smart edge control, and tidy landscape tie-ins. These Mississauga scenarios show how small planning choices prevent pooling, protect neighbors, and improve curb appeal day one.
Below are condensed examples from projects we routinely deliver across Mississauga neighborhoods.
Corner lot with sidewalk adjacency
- Challenge: Two cars were overhanging the sidewalk at a tight corner.
- Plan: Add 8.5–9 feet of paver widening inside lot lines with a defined concrete curb.
- Execution: 10 inches of compacted base, 1 inch bedding, polymeric joint sand, and 1–2% slope toward the street.
- Result: No sidewalk encroachment; shoveling is easier with flush transitions.
Narrow side yard and fence constraints
- Challenge: The vehicle door was hitting a fence and trampling turf.
- Plan: Shift the widening 18–24 inches forward and use a crisp paver border to redirect traffic to the walk.
- Execution: Geotextile + 8 inches base; rigid edge restraint to prevent spread near the fence line.
- Result: Doors clear easily and lawn damage stops.
Steep approach and winter ice
- Challenge: A short, steep approach was icing each winter.
- Plan: Regrade for a consistent 1–2% cross slope and provide a snow storage pocket away from the entrance.
- Execution: Base reconstruction on the widened side with compacted lifts and a textured paver surface.
- Result: Less ice formation and safer footing at the front steps.
When widening is part of a larger refresh, we often combine slope correction with a new front walk and a seasonal maintenance plan so the site stays sharp through fall and winter.
Permits, Rules, and Safe-Dig Protocol
Check local driveway and encroachment rules, then request utility locates before digging. Keep all widening within property lines and respect setbacks from sidewalks and boulevards. Document slopes and edges in your plan so drainage and safety are addressed before you start.
Rules exist to keep sidewalks clear, boulevards intact, and utilities safe. Before any shovel hits the ground, request locates and review your survey. If you’re integrating interlocking, our interlocking permits overview outlines the typical coordination steps.
For additional perspective on hardscape choices in Ontario climates, see this independent review of interlock driveway pros and cons. Broader planning viewpoints can also help you think through traffic flow and maintenance, such as this hardscaping planning advice and a quick tour of landscape design ideas from a neighboring region.
Integrating Widening with Landscaping
Treat widening as part of your front-yard plan. Align borders with walks and beds, reinforce slopes with low retaining where needed, and refresh mulch to frame edges. The best projects look intentional because driveways, plants, fences, and lighting all work together.
Our design-build approach links the parking surface to everything around it.
Practical tie-ins we recommend
- Walkway alignment: Match paver styles or borders so the entry sequence feels cohesive.
- Low retaining and grade breaks: Use small retaining walls or armour stone to hold soil at edges.
- Fence adjustments: Shift or update panels to prevent gate conflicts and improve sightlines.
- Mulch and bed cleanup: Refresh 2–3 inches of mulch and re-edge beds to control weeds and erosion.
- Lighting: Add path or step lights where vehicle doors open and people walk.
To see how we connect structure and planting, explore our landscaping services in Mississauga. The goal is one durable, low-maintenance layout, not separate projects stitched together.
Thinking about widening? We’ll map your lines, set grades, and design the edge details. Book a brief planning chat so we can right-size your project and coordinate the landscaping around it.
Maintenance and Longevity
Sweep seasonally, top up polymeric joint sand as needed, and check edges each spring. Keep slopes clear, repair any settlement early, and plan a quick fall cleanup. A few 15-minute tasks extend the life of your widening by years.
Driveways work hard through Ontario winters and summer heat. A short checklist protects the investment.
- Quarterly sweep: Remove grit before it locks into joints and scuffs finishes.
- Spring inspection: Walk edges, confirm restraints are tight, and touch up joint sand where gaps appear.
- Drainage check: After a heavy rain, confirm water moves off at 1–2% and doesn’t pool near steps.
- Snow practices: Use plastic shovel edges on pavers; pile snow where it won’t damage beds.
- Vegetation control: Keep 2–3 inches of mulch in adjacent beds to limit splash and weeds.
Maintenance stays easy when edges are designed well up front. That’s why we combine widening with mulch refreshes and bed edging in one visit whenever possible.
Related Planning Topics You’ll Touch
Driveway widening connects to walkway routing, slope correction, and seasonal maintenance. Address these together to control costs and avoid rework. A coordinated plan ensures your front yard looks finished and functions well right away.
Widening rarely lives alone. These planning items belong in the same conversation:
- Front walkway adjustments to fit the new parking geometry
- Soil retention or slope correction where grades change at edges
- Fence alignment and gate swing clearances
- Seasonal maintenance planning for low-effort upkeep
If you want a big-picture view, our design–build primer shows how to bundle tasks into one schedule.
Frequently Asked Questions
How wide should a second parking stall be?
Plan about 8.5–9 feet per vehicle for comfortable door opening. If a fence or steps are nearby, add 2–3 extra feet for clearance. Keep everything inside your property lines and maintain a 1–2% slope away from the house.
Do I need to call for utility locates before widening?
Yes. Always request utility locates before excavation. Markings help you avoid gas, electric, telecom, and water lines. Schedule widening only after utilities are cleared and the layout is confirmed on site.
Which surface is best—pavers, concrete, or asphalt?
It depends on goals. Pavers offer premium curb appeal and sectional repairs. Concrete delivers a monolithic look with crisp lines. Asphalt ties in smoothly to existing asphalt. All options need a strong base, locked edges, and 1–2% drainage slope.
Can widening affect my landscaping?
Yes, in a good way when planned. We align new edges with walkways, adjust fencing if needed, refresh mulch, and re-edge beds. Treat widening as part of a front-yard plan so the result looks intentional and stays easy to maintain.
Conclusion: Plan Once, Build Confidently
Successful driveway widening in Mississauga starts with lines, grades, and edges. Confirm property limits, set a 1–2% slope, overbuild the base, and lock the borders. Coordinate with walkways and beds so the upgrade looks finished on day one and stays that way.
- Key takeaways: Map lines, preserve drainage, and choose materials to match your home.
- Action steps: Pull your survey, sketch width and slopes, and request utility locates.
- Next move: Explore our driveway extension insights and book a planning chat.
Ready to make parking easier? Schedule a quick on-site review so we can right-size the design and coordinate the landscaping around it—then build it once, the right way.