Garden bed edging tips are proven methods for creating clean, durable borders that separate lawns, mulch, and walkways. In Mississauga’s freeze‑thaw climate, good edging controls grass creep, improves drainage, and reduces maintenance. At HR Greenroots Landscaping, we pair edging with sod installation, interlocking, and mulching so your beds look intentional and stay easy to care for.
By HR Greenroots Landscaping • Last updated: 2026-05-02
At a Glance
The fastest way to get crisp, lasting garden bed edges is to combine a stable border (steel, stone, or a paver soldier course) with proper base prep, a defined mowing strip, and 2–3 inches of mulch. This limits grass invasion, protects soil structure, and cuts weekly bed cleanup to minutes.
Here’s what you’ll learn in this complete, field-tested guide from our Mississauga design–build team.
- What edging does and how it works with sod, mulch, and pavers
- When to choose steel, stone, or paver borders (and why)
- Step-by-step installation for clean, repeatable results
- Maintenance habits that actually keep edges sharp
- Local, GTA-specific tips for winter, salt, and clay soils
What Is Garden Bed Edging?
Garden bed edging is the structural boundary that separates planting beds from turf, gravel, or hardscape. The best edging resists movement, blocks grass rhizomes, and creates a consistent mowing strip so maintenance stays simple. Materials range from flexible steel to stone and paver borders.
Edging is more than a visual outline. It’s a control line that keeps beds clean, mulch contained, and lawns from creeping. In our projects across Mississauga and the GTA, edging is the backbone of tidy planting plans and low-upkeep yards.
- Controls grass spread: Stops stolons/rhizomes from creeping into beds.
- Holds mulch: 2–3 inches stays put through rain and spring melt.
- Protects bases: Defines the edge where interlocking and walkways meet soil.
- Guides water: Helps direct surface runoff toward safe drainage points.
Because edging interacts with turf roots, soil compaction, and hardscape bases, it should be designed together with sod installation, interlocking walkways, and any retaining features. That integrated approach is how we deliver clean edges that actually last.
Why Edging Matters in Mississauga and the GTA
In the GTA’s freeze–thaw cycle, stable edging prevents heaving, mulch spillover, and turf invasion. Proper depth, spikes, and base prep keep lines straight through winter, salt, and spring saturation—reducing seasonal rework and preserving curb appeal.
Our region’s soils range from clay loam to sandy pockets, and winter swings can push flimsy edges out of alignment. Salt near driveways, heavy rain in spring, and summer heat stress compound the problem. Thoughtful material choice and installation depth counter these forces.
- Freeze–thaw movement: Flexible steel or anchored pavers absorb heave better than thin plastic.
- Snow and salt: Salt exposure near drives favors stone or paver borders over bare aluminum.
- Spring saturation: A compacted sub-base and drainable mulch (not soil mounding) keep edges intact.
- Summer maintenance: A defined mowing strip can shave minutes off every cut all season.
If you’re refreshing sod, adding an interlocking path, or rebuilding a bed, plan edging first. It determines where turf ends, mulch starts, and how you’ll maintain the transition.
How Garden Bed Edging Works
Edging works by creating a physical barrier at a set depth and height that resists lateral soil and root movement. When paired with a compacted base and a flush mowing strip, it channels water, keeps mulch in place, and gives lawn tools a clear, damage-free path.
The mechanics are simple but precise. A 3–4 inch soil cut with compacted mineral base forms the pocket. The edging anchors into that base and sets a repeatable height—typically flush to 0.5 inch above grade where you mow. That level is your maintenance reference every week.
- Barrier function: Stops turf rhizomes and keeps bed media from migrating.
- Base interaction: Compactable aggregates (e.g., HPB or screenings) resist settlement.
- Water behavior: Micro-grade to direct runoff to lawn, drain tile, or a swale.
- Tool clearance: Trimmer line or mower deck runs clean without scalping plants.
Done right, edging is the quiet component that makes the rest of your landscape work better—especially around interlocking patios and walkways where crisp lines matter most.
Types of Edging: Pros, Cons, and Best Uses
Choose edging by balancing durability, maintenance, and design intent. Steel gives the crispest curves, paver soldier courses excel beside interlocking, natural stone adds weight and texture, and concrete curbs provide mass where snow, salt, or wheels apply pressure.
Flexible steel edging
- Best for: Tight curves, modern lines, low-profile mowing strips.
- Strengths: Cleanest look; resists heave with proper spikes; paints well.
- Consider: Use galvanized or powder-coated; add spikes every 12–18 inches.
Aluminum edging
- Best for: Lightweight installs, gentle curves, corrosion resistance.
- Strengths: Easy to cut and shape; won’t rust.
- Consider: Can shift under impact; add more anchors near corners.
Plastic/poly edging
- Best for: Budget-friendly projects and simple lines.
- Strengths: Flexible; fast installs.
- Consider: Prone to heave and UV brittleness over time in GTA climates.
Natural stone (armour stone, cobble)
- Best for: Heritage looks, lawn-to-bed transitions with texture.
- Strengths: Heavy mass resists movement; matches stone work.
- Consider: Requires leveling and base; weight adds labor but pays off in stability.
Paver soldier course (set in base)
- Best for: Borders that meet interlocking walkways, patios, and drives.
- Strengths: Integrates with paver base; highly durable; easy to mow along.
- Consider: Needs compacted aggregate base and edge restraint for longevity.
Poured concrete curb
- Best for: High-traffic edges, snowblower zones, and salt exposure.
- Strengths: Mass and continuity; excellent for straight runs.
- Consider: Requires expansion joints and control of finish height.
Living edge (deep spade cut)
- Best for: Natural garden styles, seasonal refreshes.
- Strengths: No materials required; very flexible layout.
- Consider: Needs regular re-cutting; mulch containment is weaker.
Best Practices: 18 Garden Bed Edging Tips That Actually Work
The best edging results come from disciplined layout, compacted base layers, and a consistent finish height. Space spikes 12–18 inches, keep mulch 2–3 inches below grass height, and set a 3–4 inch deep edge pocket so turf roots and bed media stay in their lanes.
- Plan the line: Lay a hose to visualize curves; avoid tight radii a mower can’t follow.
- Mind the finish height: Flush to 0.5 inch above lawn level prevents mulch spill and scalping.
- Cut a clean pocket: 3–4 inch deep soil cut with vertical face holds the border steady.
- Compact the sub-base: Use crushed screenings or HPB; hand-tamp in small pockets.
- Spike discipline: Steel/aluminum stakes every 12–18 inches; double up at corners.
- Mowing strip: Maintain a 2–3 inch hard surface or firm soil margin for wheels.
- Mulch right: Keep mulch 2–3 inches deep and below the grass crown; never mound against stems.
- Separate systems: Don’t rely on mulch to hold paver bases—use proper restraints.
- Salt-aware zones: Choose stone or pavers near driveways where chloride exposure is routine.
- Planting offset: Keep perennials 6–12 inches back from the edge to reduce trimming.
- Use geotextile selectively: Under gravel edges, fabric limits fines migration.
- Account for downspouts: Micro-grade to keep runoff from cutting channels into mulch.
- Test lines with wheels: Run the mower along new edges before final set.
- Pre-finish sod edges: With new turf, roll and water before installing borders.
- Edge continuity: Carry lines through gates, fence posts, and shed corners.
- Stagger joints: On paver borders, offset joints to avoid weak points.
- Color coordination: Match edging tones to interlocking or stone work for cohesion.
- Document elevations: Snap a few reference photos; they’re useful after winter.
These are the small, repeatable habits our crews use to keep edges straight on day one and easy to maintain through the seasons.
Tools and Resources
You’ll need a flat spade, trenching shovel, hand tamper, string line, stakes, and a compactable aggregate like screenings. For paver borders, add a plate compactor and polymeric sand. Keep a line level and measuring tape handy to control finish height.
- Layout: Hose or string line, marking paint, flags.
- Excavation: Flat spade, trenching shovel, mattock for roots.
- Base prep: Screenings or HPB, hand tamper, small plate compactor (for long runs).
- Fastening: Galvanized spikes, mallet, driver for connectors.
- Finishing: Line level, measuring tape, broom for cleanup.
For integrated projects—new turf, interlocking paths, or retaining features—coordinate with a design–build team. Our landscape design and build process aligns edges with planting, grading, and hardscape bases so everything works together.
Step-by-Step Installation Methods
Successful installs follow a fixed order: lay out the line, excavate a pocket, compact a base, set the edging to a reference height, anchor it on a cadence, then backfill and mulch. Consistency beats speed—measure often and compact in thin lifts.
Steel or aluminum edging (lawn-to-mulch)
- Layout: Mark the line with a hose or paint; check mower clearance.
- Excavate: Cut a 3–4 inch pocket with a vertical lawn face.
- Base: Add 1–2 inches of screenings; hand-tamp until firm.
- Set height: Top of edging flush to 0.5 inch above lawn; verify with a level.
- Anchor: Spikes every 12–18 inches; double at curves and terminations.
- Backfill and mulch: Keep mulch 1–2 inches below turf height for a clean reveal.
- Proof run: Roll a mower wheel to confirm clearance before final tidy.
Paver soldier course (bed border beside walkway)
- Over-excavate strip: 8–10 inches wide along the path; maintain the walkway’s base depth.
- Base build: Compact aggregate in 2-inch lifts until solid.
- Set the border: Lay pavers on the bedding layer; keep a consistent reveal.
- Restrain: Install an edge restraint and spikes on the lawn side of the soldier course.
- Jointing: Sweep in polymeric sand; activate per manufacturer guidance.
- Top up mulch: Hold below the paver edge to prevent wash-over.
For an extended, paver-focused walkthrough, see this step-by-step patio guide that mirrors the same base principles used for soldier-course borders.
Maintenance and Seasonal Care
Keep edges sharp with quick monthly checks: top up mulch to 2–3 inches, re-seat any spikes that lifted, re-cut living edges, and sweep paver reveals. Before winter, remove leaves that trap moisture along borders to minimize heave and spring cleanup.
- Monthly: Inspect for spike lift; tamp any soft pockets after heavy rain.
- Seasonal: Spring mulch refresh; fall leaf removal along edges to prevent rot.
- Winter: Mark edges near drives so snow clearing avoids direct impact.
- After thaw: Re-level a few high spots; edge lines settle as soils relax.
When we pair edging with premium sod installation and landscaping GTA planning, maintenance becomes a light routine instead of a weekend project.
Local considerations for Mississauga
- Plan for freeze–thaw: flexible edging or anchored pavers resist heave better than thin plastic.
- Time mulch refreshes for late spring after the last hard frost; aim for 2–3 inches.
- Near salted drives and walks, prefer stone or paver borders and rinse edges in early spring.
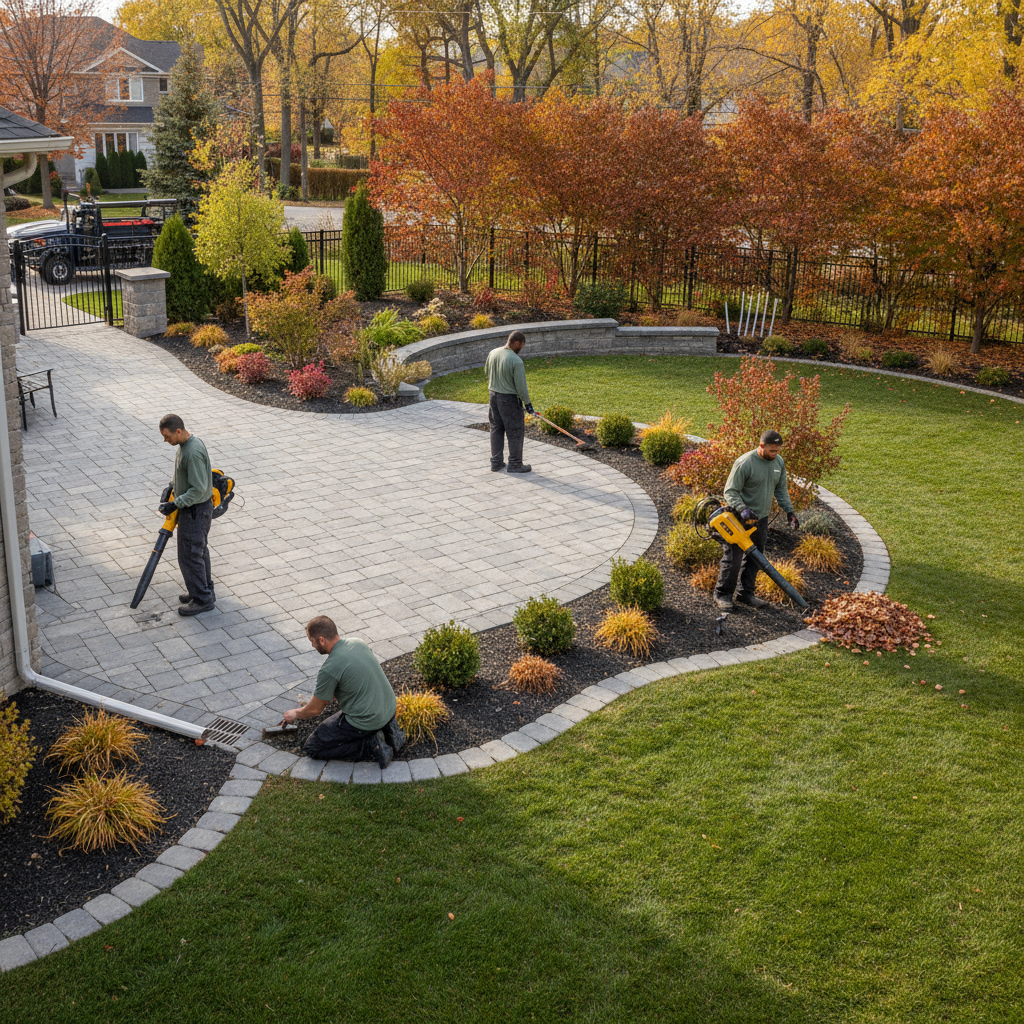
Case Studies and Real-World Examples
Integrated edging succeeds when it’s planned with sod, interlocking, and planting. These Mississauga-area scenarios show how material choice, base prep, and finish height decisions translate into clean lines, fewer weeds, and faster weekly maintenance.
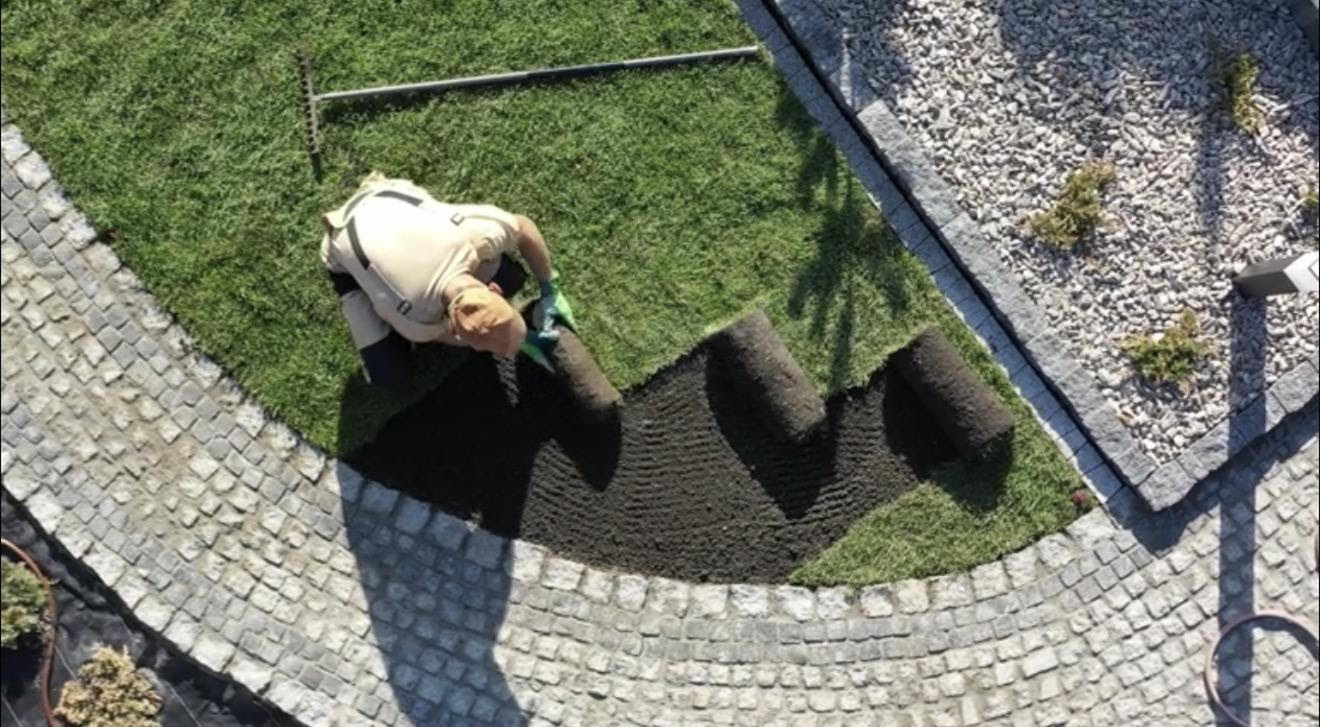
Front-yard refresh with sod and steel edging: We re-laid turf and installed galvanized steel edging along curved beds. A 3–4 inch pocket and spikes on 12–16 inch centers kept lines true. The homeowner reports faster mowing and fewer mulch spillovers after storms.
Walkway plus soldier-course border: Along an interlocking path, we built a compacted base strip and set a contrasting paver soldier course. The firm reveal made trimming unnecessary; the border also protected the walkway bedding from migrating into the bed.
Sloped side yard with stone edge and retaining wall: Armour stone edging tied into a small retaining wall managed grade changes. The added mass resisted winter push and defined planting pockets, avoiding soil washouts during spring melt.
Commercial frontage in the GTA: For a multi-tenant site, we used paver mowing strips beside sod to reduce trimmer work. Crews now run mowers wheels-on without scalping turf, trimming time per visit noticeably dropped.
Common Edging Mistakes to Avoid
Most edging issues come from shallow pockets, missing compaction, and inconsistent finish height. Avoid laying borders on bare soil, skipping edge restraints near pavers, or piling mulch above turf level—all of which cause movement and messy lines within a season.
- Border set on uncompacted soil—expect tilt after the first storm.
- Mulch mounded against stems—invites rot and weeds.
- No restraint beside pavers—borders drift; sand migrates.
- Edge height too high—mowers scalp; too low—mulch washes over.
- Overly tight curves—forces string trimming every week.
If a past install failed, we can often salvage it by rebuilding the base, resetting the finish height, and adding proper restraints—far cheaper and cleaner than starting from scratch.
Integrating Edging with Sod, Pavers, Fences, and Sheds
Edging shines when it coordinates with turf, hardscapes, and structures. Plan edges alongside sod replacement, interlocking, retaining walls, fence lines, and sheds so base layers and finish heights align. This creates continuous movement and easier maintenance throughout the yard.
Edging is one element in a bigger system. During landscaping services in Mississauga, we align mower wheels, paver reveals, and planting offsets so you can move through zones naturally.
- Sod transitions: Roll and water new turf before setting edging to lock in height.
- Paver tie-ins: Use soldier courses and restraints to protect walkway bedding.
- Retaining walls: Terminate borders into wall ends for a tidy, structural finish.
- Fences and sheds: Carry edges through posts and corners to eliminate weed traps.
For more layout strategy across property types, explore our design–build overview, which shows how edges support circulation, privacy, and planting depth.
When to DIY vs. Bring in a Crew
DIY works for short, simple runs using steel or aluminum with light curves. Hire a crew for long stretches, complex grades, paver borders that share bases, or when integrating with sod and interlocking. Professional compaction and finish grading pay off in longevity.
- DIY-friendly: 20–40 feet of gentle curves, shallow roots, accessible soil.
- Call pros: Slopes, long runs, tree roots, base ties near pavers and retaining walls.
- Design support: A quick layout review can prevent recurring maintenance headaches.
Our coordinated approach across sod, interlocking, and stone work ensures edges aren’t an afterthought but a durable part of the whole system.
Need a second set of eyes? Book an on-site assessment with our Mississauga team. We’ll align edging, sod, and interlocking so your beds stay sharp and easy to maintain.
Start with our GTA planning guide to see how pieces fit together.
Advanced Tips and Troubleshooting
If edges wander or heave, rebuild the first 6–8 inches of line with compacted base, reset spike cadence, and re-establish your reference height. Near pavers, add edge restraints; on slopes, terminate into a mass element like stone or a small retaining wall.
- Heave fix: Remove 6–8 inches of line; rebuild base; reset anchors.
- Soft soils: Widen the base strip and switch to a heavier border element.
- Weed strip: A narrow gravel band at the lawn side can break capillarity and reduce weed creep.
- Downspout scour: Add splash pads or redirect to a swale to protect mulch.
For walkway interfaces, these hardscaping pointers illustrate layout moves that also stabilize bed edges next to traffic areas.
Design Ideas and Inspiration
Use edging to frame views and guide movement: contrast mulch and turf colors, echo paver tones in borders, and vary bed depth for seasonal layers. Curves should feel intentional, not busy—your mower and your eye both prefer smooth transitions.
- Contrast: Dark mulch against light pavers creates a crisp reveal.
- Repetition: Carry an edging material across front and back yards for cohesion.
- Layering: Place low groundcovers near the edge and taller perennials set back.
- Movement: Align edges with desire lines between doors, gates, and sheds.
For more inspiration on overall layout thinking, review this regional design overview and adapt the ideas to Mississauga’s climate and soil conditions.
Frequently Asked Questions
Homeowners ask about the best edging for curves, mowing ease, and winter heave. Steel handles curves best, paver borders excel near walkways, and proper base plus spike spacing keeps everything tight through winter. Keep mulch 2–3 inches deep and below turf height for clean lines.
What edging holds up best through GTA winters?
Steel and paver soldier-course borders perform well when paired with a compacted base and 12–18 inch spike spacing. Plastic is more likely to heave. Near salted driveways, consider stone or pavers for added mass and salt tolerance.
How deep should I cut the edge pocket?
Aim for a 3–4 inch deep pocket with a vertical lawn face. Add 1–2 inches of compacted screenings or HPB beneath steel or aluminum borders. For paver borders, match the walkway’s base depth to keep everything at the same finish height.
What’s the ideal mulch depth along the edge?
Hold mulch at 2–3 inches deep and 1–2 inches below turf height. This prevents spillover during heavy rain and keeps mower wheels from dragging mulch onto the lawn or walkway.
Can I add edging after new sod is installed?
Yes. Let new sod root and level first—typically a few weeks—then cut your pocket and set the border to the established turf height. Rolling and watering the lawn before edging helps lock in a consistent finish elevation.
Should edging match my pavers or contrast them?
Both approaches work. Matching creates a seamless, formal look. Contrasting materials draw a defined outline and can highlight curves or planting depth. Choose the option that supports your home’s style and sightlines from doors and windows.
Key Takeaways
Plan edging with the rest of your landscape, not after. Use compacted bases, disciplined spike spacing, and consistent finish height. Choose materials for your conditions—steel for curves, pavers near walkways, stone for mass—and keep mulch 2–3 inches deep below turf height.
- Edging is a control line—design it with sod, pavers, and planting.
- Depth, compaction, and finish height are non-negotiable.
- Maintenance is light when the system is built right.
- GTA winters reward heavier, anchored solutions.