Mississauga sod installation cost is the set of factors that determine the investment to replace or build a lawn in Mississauga. From our base at 100 Matheson Blvd E unit 202, HR Greenroots Landscaping evaluates area, grading, soil prep, access, disposal, and establishment care. The right sequence protects lawn quality and reduces long-term spend.
By HR Greenroots Landscaping — Visit our business profile
Last updated: May 14, 2026
At a Glance: Mississauga Sod Installation Cost Factors (2026)
The main drivers of sod installation cost in Mississauga are total lawn area, site access, grading and topsoil preparation, removal/disposal of existing turf, and aftercare. Add-ons like edging, irrigation, and walkway borders adjust scope. Strong base prep and tight seams reduce rework, improving durability and curb appeal.
Here’s a quick orientation to help you frame your request-for-quote and compare approaches on more than just headline promises:
- Area and layout: Square footage, curves, and obstacles shape material and labor.
- Access and logistics: Gate width, stairs, parking, and staging affect crew efficiency.
- Soil health: Stripping, amending, and compacting a level base supports rooting.
- Drainage and grading: Positive slope away from structures prevents pooling.
- Disposal: Old sod, roots, and debris removal adds time and hauling.
- Aftercare plan: Watering, first mowing, and edge upkeep protect the finish.
What Is “Sod Installation Cost”?
Sod installation cost refers to the end-to-end effort to deliver an even, healthy lawn—assessment, removal, grading, base build, sod supply, installation, rolling, clean-up, and establishment support. It’s scope-based, not a flat rate. Site realities and goals determine the timeline and resources required.
Sod is a system, not just rolls of grass. The visible surface succeeds because the base drains correctly, seams are tight, and roots get early moisture. In our experience on Ontario properties, lawns that receive disciplined base prep and watering in weeks one to four stay uniform and resist weeds far longer.
For a deeper look at our approach, see our sod installation service overview, which explains how we integrate grading, edge control, and planting plans to support easy maintenance.
Why It Matters in Mississauga
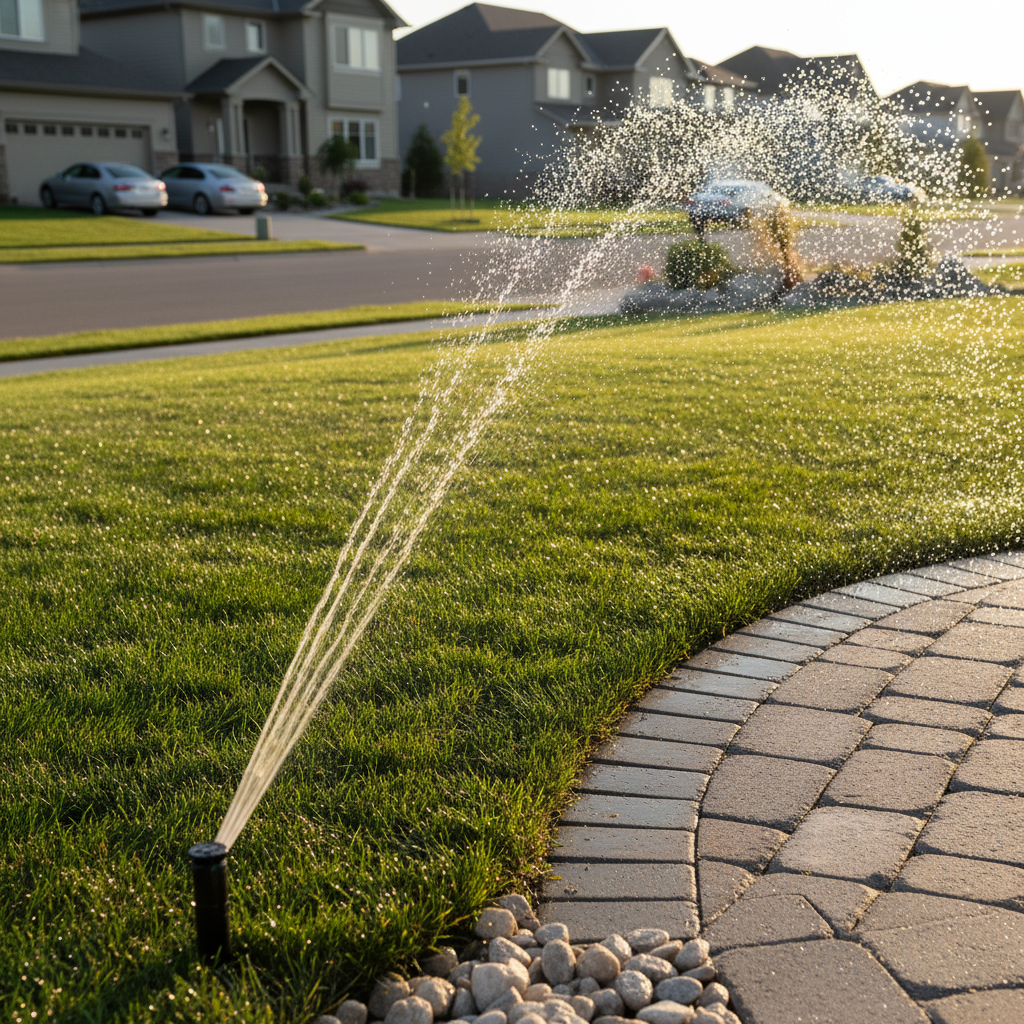
In Mississauga and across the Regional Municipality of Peel, freeze–thaw cycles, clay-heavy subsoils, and summer heat stress demand solid prep. Proper grading, soil structure, and watering discipline protect new sod from heaving, thinning, and runoff—issues that shorten lawn life and raise maintenance.
We often see compacted clay in older yards. Without correction, water sits near seams, encouraging weeds and disease. Meanwhile, hot, breezy summer afternoons increase evaporation, so timing irrigation makes a visible difference. Early-morning watering cuts loss and gives roots time to drink before midday heat. Guidance from EPA WaterSense emphasizes watering lawns only when needed and targeting deeper, less frequent cycles for resilience.
To understand local weather swings as you plan, review climate normals near Mississauga (Toronto Pearson). Long warm spells and intermittent rainfall require flexible watering to support root knit-in. Refer to Environment and Climate Change Canada for seasonal temperature and precipitation patterns.
Local considerations for Mississauga
- Watering windows: Aim for pre-dawn to mid-morning. Breezy corridors near Saigon Park can increase evaporation—adjust run time accordingly.
- Seasonal timing: Spring and early fall help roots establish faster thanks to cooler air and steadier rainfall patterns.
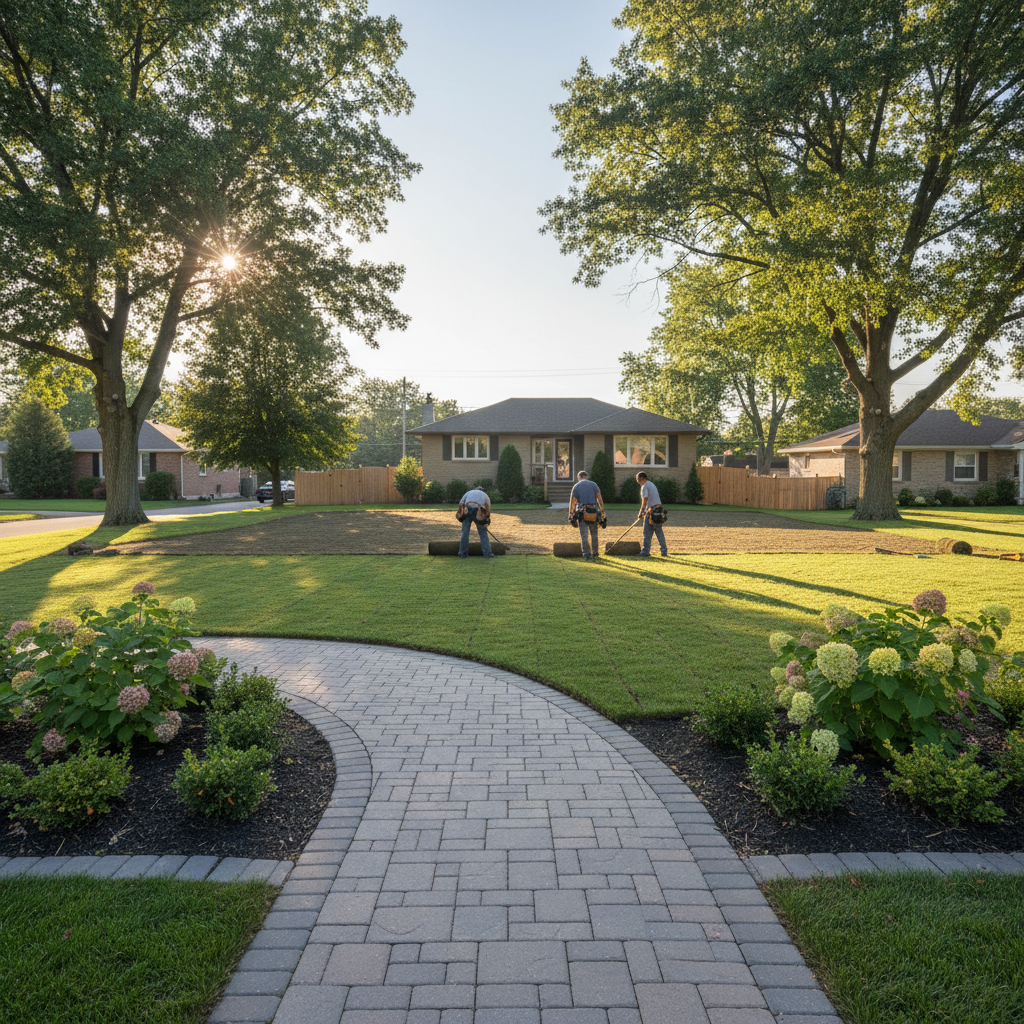
- Access reality: In tight side yards around Lambton College-adjacent streets, plan material staging and gate measurements before crews arrive.
How Sod Installation Works (The Proven Sequence)
A durable sod install follows a strict sequence: assessment, removal, grading, base build with screened topsoil, precision laying with staggered seams, rolling for root contact, immediate watering, and clean-up. Each step affects drainage, edge crispness, and rooting during weeks one to four.
Below is the sequence our Mississauga crews use daily. Most of the quality is decided before a single roll is placed.
- Measure and assess: Document slopes, obstacles, sun/shade, and gate widths.
- Strip existing turf: Remove weedy patches and thatch. Dispose responsibly.
- Rough grade: Correct highs/lows; set positive slope away from structures.
- Build the base: Spread screened topsoil; amend as needed; fine-grade and lightly compact for evenness without sealing.
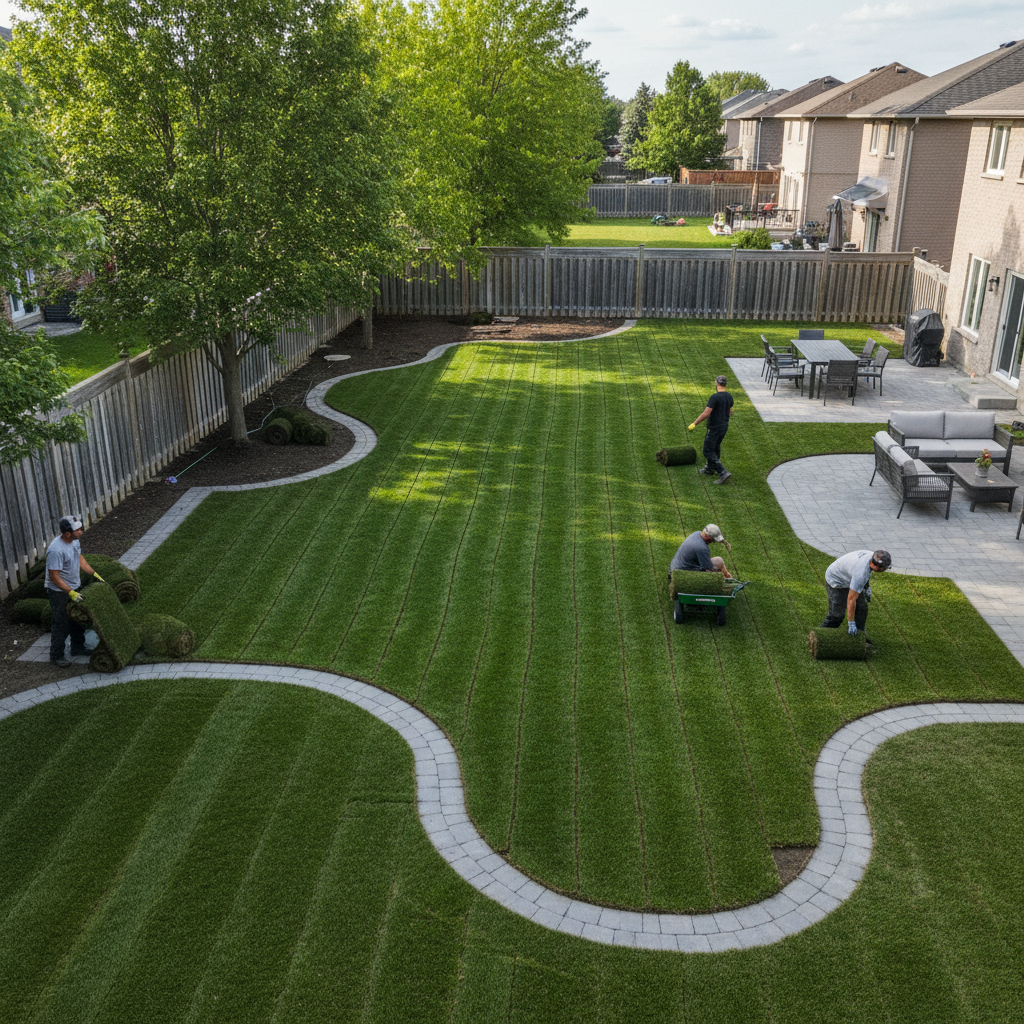
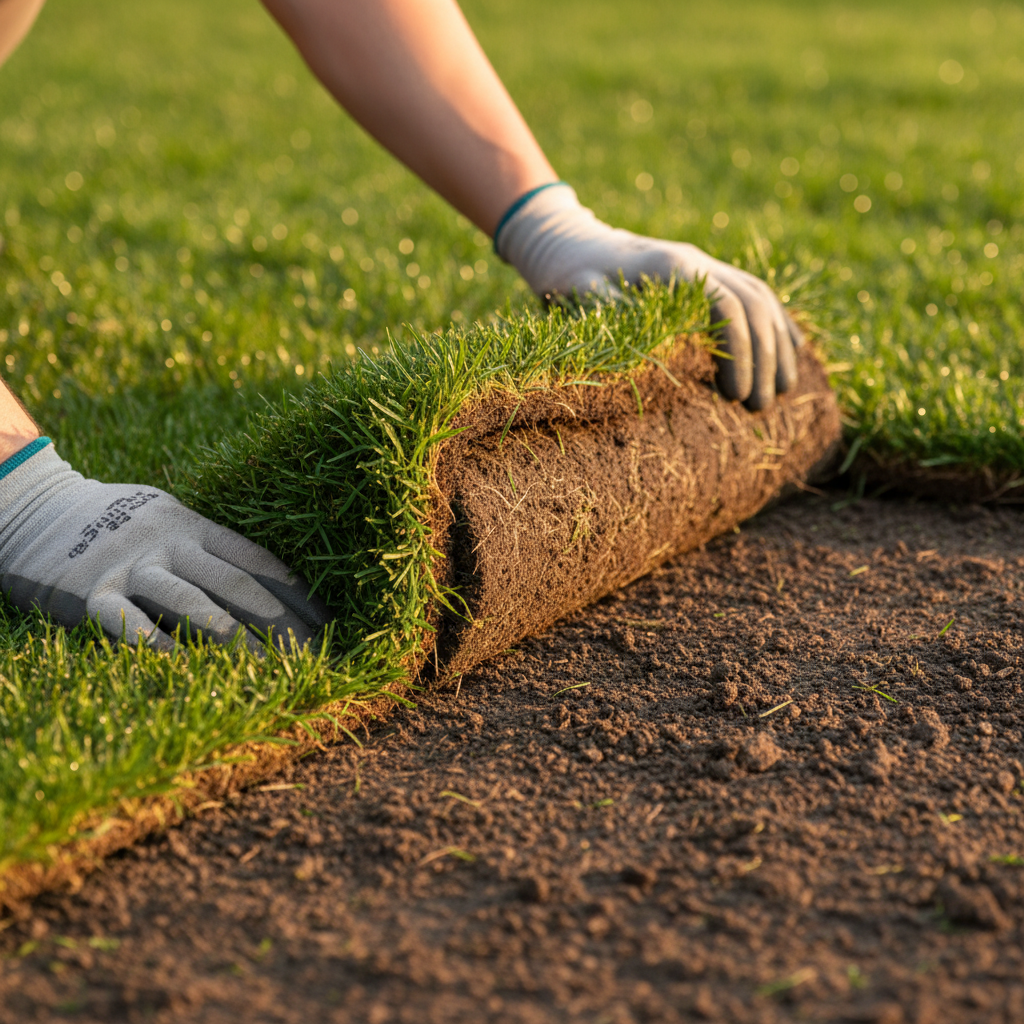
- Lay sod: Use a brick pattern; pull seams tight; trim edges clean to beds and hardscape.
- Roll the surface: Improve soil contact to speed rooting and reduce air gaps.
- Water immediately: Begin an establishment schedule tailored to weather.
- Handover and clean-up: Review mowing height, watering plan, and foot-traffic limits.
Most cool-season sod begins to knit within two weeks under proper irrigation; guidance from the University of Guelph Turfgrass Institute aligns with our field results on Ontario lawns. Deep rooting builds from consistent moisture under the root mat, not just green blades on top.
Types and Methods: Matching Sod, Soil, and Site Profiles
Select sod blends and soil strategies for Ontario conditions. Kentucky bluegrass offers dense color and recovery; tall fescue tolerates shade and heat. Pair turf with screened topsoil, defined edges, and weed suppression to reduce rework and keep the lawn crisp year-round.
Sunlight, traffic, and drainage patterns decide the blend. For example, a part-shade yard with afternoon heat often benefits from a bluegrass-fescue mix. Edges matter just as much—clean transitions to interlocking pavers or garden beds create predictable mowing lines and reduce weed incursion.
Recommended sod options
- Kentucky bluegrass: Fine texture, strong recovery from wear, classic deep green.
- Tall fescue: Better heat and drought tolerance; stronger shade performance.
- Perennial ryegrass (in mixes): Fast establishment; helps early uniformity.
Base and edging elements
- Screened topsoil: Even, stone-free layer supports consistent rooting and mowing.
- Compost amendments: Improve structure and moisture retention in sandy pockets.
- Targeted sand: In localized wet spots, sand can aid percolation (used sparingly).
- Edge control: Steel edging, paver bands, or clean garden bed borders keep lines crisp.
Explore how we integrate sod with hardscape in our Mississauga sod guide, which shows edge details around walkways and beds.
Pricing Factors and Scope Variables (No Dollar Amounts)
Total investment reflects scope, not a sticker price. Square footage, removal/disposal, base rebuilding, edge detailing, access constraints, season/timing, and aftercare support all shape a quote. Fixing grading before laying sod avoids redo work and extends lawn life.
When you request a quote, focus on outcomes: play space, pet durability, curb appeal, or lower maintenance. Then describe site realities—gate widths, slopes, shade, and existing bed edges—so the proposal reflects actual work rather than assumptions.
Core scope elements
- Site assessment and measurement with notes on sun, slope, and access.
- Removal of old turf and organic debris with responsible hauling.
- Rough and fine grading to set water flow and surface evenness.
- Topsoil build and leveling to support rooting and mowing quality.
- Precision sod laying, rolling, watering start-up, and clean-up.
Complexity drivers
- Tight access requiring hand-carry or relay carting of rolls.
- Embedded rubble or thick thatch layers in older lawns.
- Irregular borders, tree roots, or numerous bed transitions.
- High-traffic corners where edging and compaction must be precise.
Common add-ons
- Edging with pavers or steel to define mowing lines.
- Walkway borders for curb appeal and cleaner transitions.
- Drainage corrections such as subtle swales or catch basins.
- Irrigation layout or timers to support consistent establishment.
For timing insight, read our note on best seasons for sod in the GTA and how weather windows influence establishment.
Best Practices to Reduce Lifetime Spend
To lower lifetime lawn spend, invest in base prep, crisp edges, and disciplined watering in weeks one to four. These prevent rutting, weeds, and seam lifting—common failures that trigger rework. Once rooted, mow high with a sharp blade and feed modestly to sustain density.
We use a simple rule: grade first, beautify second. Edges are next, because they decide mowing time every week. Finally, water to the root zone. Many homeowners are surprised how much these basics extend lawn life.
Focus on water and root health
- Water deeply: Many cool-season lawns target roughly an inch of water per week (including rainfall), adjusted for heat and wind; EPA WaterSense promotes watering only when needed to avoid waste.
- Establish a schedule: Early mornings reduce evaporation and leaf disease risk.
- Limit traffic: Keep heavy use off the lawn until tug-tested seams resist lift.
Edge with intent
- Define mowing lines with paver bands or steel edging to cut trim time.
- Use bed edges to block creeping grasses from mulch zones.
- Align edges with walkways to improve curb appeal and reduce snags.
Feed and mow for density
- Use modest, seasonal fertilization once rooting is established.
- Mow high and keep blades sharp to reduce stress and scalping.
- Leave clippings when possible to recycle nutrients back into the soil.
How We Work and Helpful Tools
We pair on-site assessment with precise grading and edge control to deliver even, low-maintenance lawns. Digital measuring, slope levels, and soil probes help right-size scope. For homeowners, hose timers and rollers make establishment easier and more consistent.
Because HR Greenroots is a coordinated design–build team, we can align sod edges with interlocking walkways, decks, or garden beds during planning—reducing later adjustments. That coordination also streamlines staging and access on busy streets.
Our field toolkit
- Digital measuring, laser levels, plate compactors, and lawn rollers.
- Soil probes and hand rakes for fine grading and seam control.
- Clean-up kits for tidy edges and post-install presentation.
Helpful homeowner aids
- Hose timers to maintain consistent watering while you’re at work.
- Portable sprinklers to cover corners without overspray on pavement.
- Mowing height gauges to keep blades at the right setting.
See how we tie lawn edges into walks and patios in our Mississauga sod guide, which shows close-ups of seams and border transitions.
DIY vs Professional: Which Approach Fits?
DIY works for small, simple areas with easy access. Professional crews add value when grading is needed, access is tight, edges are complex, or timelines matter. The tipping points are disposal, base rebuilding, and achieving durable, clean edges on day one.
Use this quick comparison to decide where a crew saves time and protects your results.
Consideration DIY Professional Install Scope & access Best for small, open yards Suited to complex or tight sites Base prep Requires rented tools Included with grading equipment Edges & borders Manual trimming Integrated with walkways/beds Time to finish Weekends or staggered Coordinated in fewer visits Aftercare setup Self-managed Handover plan providedCurious how a pro sequence looks in action? Our professional sod article walks through staging, seam work, rolling, and watering handoff.
Case Studies: Mississauga Lawns Done Right
Three quick scenarios show how area, access, and edges change the plan. In every case, grading first, then crisp installation, created even surfaces and clean mowing lines—reducing maintenance and keeping the lawn photo-ready across seasons.
Detached home near City Centre
A patchy front yard over compacted clay. We stripped the turf, loosened the base, added screened topsoil, and tied edges to an existing walkway. Two weeks of scheduled watering produced tight seams and uniform color. The owner reports smoother mowing and fewer weeds drifting into beds.
Townhome close to Saigon Park
Tight side access and shading from a neighboring fence. We staged pallets up front, relayed rolls by cart, used a shade-tolerant mix, and sharpened bed edges to reduce creeping. During summer heat, a pre-dawn watering window kept color even without runoff onto the sidewalk.
Corner lot east of Hurontario
Heavy foot traffic and a wavy curb line. We introduced a subtle swale, aligned the sod edge with a new paver band, and rolled thoroughly for contact. The result: faster mowing and a strong first impression from the street—without constant string trimming.
Summary
Mississauga sod installation cost is driven by scope: area, access, grading, base build, disposal, edges, and aftercare. Plan around drainage and sunlight, pick the right blend, and water deeply during establishment. A coordinated crew prevents rework and keeps your lawn crisp longer.
- Define goals (play, pets, curb appeal) and document site realities (gates, slopes).
- Fix water movement and compaction before you think about grass color.
- Edge with intent—your mowing time depends on it every week.
Want a right-sized plan? Our Mississauga team scopes grading, access, and edges before we quote. Start with our sod installation service page and book an on-site assessment.
Frequently Asked Questions
Homeowners ask about timing, watering, mowing, and when new sod is ready for use. Short answer: install in spring or early fall, water deeply for two to three weeks, mow high once the lawn resists a gentle tug, and limit heavy use until seams knit.
When is the best season to install sod in Mississauga?
Spring and early fall offer cooler air and steadier rainfall, helping roots establish faster. Summer installs can succeed with disciplined, early-morning irrigation. Winter installs aren’t recommended because frozen ground prevents proper grading and root contact.
How often should I water new sod?
Water immediately after installation, then keep the topsoil consistently moist for the first one to two weeks. Shift to deeper, less frequent watering as roots knit. Early-morning cycles reduce evaporation and lower disease risk.
How soon can I mow new sod?
Mow once the grass reaches one-third above your target height and the sod resists a gentle tug. Use a sharp blade and remove no more than one-third of the leaf height to protect root development.
What mistakes shorten a lawn’s life?
Skipping grading, under-watering in the first weeks, and leaving edges undefined are common culprits. These lead to pooling, seam lift, weeds, and mowing frustration—issues that cost more to fix than to prevent.
Key Takeaways
Scope drives sod installation cost, but decisions on grading, edges, and watering decide longevity. Align the plan with your yard’s realities and your goals. A coordinated crew prevents rework and keeps your Mississauga lawn crisp for seasons.
- Plan around drainage and access, not just square footage.
- Pick sod blends for your sunlight and use patterns.
- Water deeply in weeks one to three; mow high with sharp blades.
- Define edges to cut weekly maintenance time and block weeds.
- Use professional help when grading, access, or timelines are complex.
Conclusion
Mississauga sod installation cost reflects the real work to create a durable, low-maintenance lawn. Grade first, edge with intent, and water on schedule. When conditions are complex, professional coordination protects the finish and your long-term investment.
Ready to plan your lawn? Start with our sod installation service and review our Mississauga sod guide. We’ll scope your yard, align on goals, and deliver a lawn that looks intentional on day one and stays sharp through the seasons.